Search This Blog

Friday 30 September 2011

Beautiful handmade pinhole cameras

Have you ever seen anything more beautiful?


Juergen (chamaeleon618 on Flickr) is some kind of genius. Not only a great photopgrapher, he constructs the most amazing pinhole cameras in wood, each one unique, hand oiled and beautiful.  The lens rotates giving you two panoramic shots on each square of film.  Superb!


Check out his work:  http://www.flickr.com/photos/lochkamera/172547171/

Wednesday 14 September 2011

Solargraphy - Our First Images!

9th September 2011

Well, today we pulled two of the cameras off Erika and Mark's roof on the seafront and decided to take a look inside.

Luckily the evil seagulls were not in evidence and retrieving the cameras was fairly simple using my handy pocket knife.  I squirrelled them into a bag and descended to meet Mike McLean who was waiting to whisk us to a darkroom.

I think it is fair to say that I honestly expected nothing at all to come out on this first run.  I know we had Simon guiding us with the size of pinhole, and I know other people have done solargraphy before using the same equipment, still, I didn't quite believe that it would work!

So when the first camera was opened and we could see the dark lines of the sun trails, I was pretty darned pleased!  Having said that, it all looked rather faint, and if there was anything else in the image it was certainly not jumping out at us.

We knew that the images would be sensitive to light and degrade fairly quickly, so our initial capture was using a digital camera to simply take a shot of the solargraph.  Here are the photos we took in the darkroom.

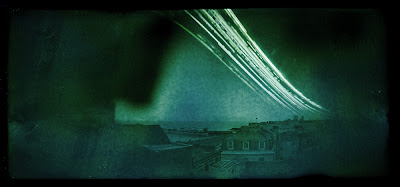
The coke can facing south west


The film Cannister facing west


As you can see the rest of the image is pretty faint, although I'm not sure that photographic paper actually gets very dark even after exposure in full sun...  Another thing to try!

Our next step was to do a more controlled digital shot and then to scan them.

Setting up for a digital photograph was actually quite tricky.  We set up with a tripod and pre-set the focus and exposure, then quickly popped the solargraph up for a couple of seconds, grabbed a few shots and then put it back in the darkbag.  I have to say we did this in daylight with the curtains closed but next time I would work at night.

Then we scanned them, which was much more practical, although you could see some serious darkening and visible degradation by the time we had finished.

Both Mike and I worked on the solargraphs, inverting the shot to get a positive image and making the best we could of them in Photoshop and Lightroom.  The strangest thing is that the images come out in colour.  From black and white paper.  Very odd.  And quite beautiful.

The larger image is the first of three coke can cameras facing South West, towards the Palace Pier.  Something seems to have obscured the image in the top left corner and we have speculated on what this might be, from a curl in the paper itself (not evident when we opened the camera) to a salt grain formed very near the pinhole aperture.  We will see if the rest of the cameras facing that way have the same problem.

Coke can pinhole solargraph looking south west towards the pier


The smaller image is from a film cannister, facing due West into the setting sun.  I think it is quite interesting how little the field of view has changed with a 45 degree change in angle.  This one showed more pronounced colours.

Film cannister pinhole solargraph looking west

We are immensely pleased to have recovered two amazing images already.  I guess we have to wait another two months for the next ones!

Solargraphy - A 9 week exposure, my first 2 images

These two solargraph images are the result of a 9 week exposure on a Brighton rooftop using pinhole cameras made from a drinks can and film canister.

Once the exposed photographic paper had been photographed and scanned, Mike and I processed the images individually to our own taste, as the output is of course highly subjective. Once an image has been inverted you could spend countless hours and produce endless variations of the image. It is a very fine balance between pulling the detail from the foreground and losing the essence and beauty of the sun trails.


Solargraph image from a drinks can pinhole camera, taken from a Kemptown, Brighton rooftop, facing south west toward Brighton Pie. Mike McLean.
You can see a much larger version of the above image here

Solargraph image from a film canister pinhole camera, taken from a Kemptown, Brighton rooftop, facing wes. Mike McLean.
The next 2 pinhole cameras are coming off the roof in early November, can't wait!

My preference was to use Lightroom 3 for the processing, including inverting the image.

Tuesday 13 September 2011

Solargraphy - Installing the cameras - 05 July 2011

The next stage of our journey was installing the cameras. Firstly, we are incredibly grateful to Erika, Mark and Oliver for allowing us to install our pinhole cameras on the roof of their beautiful apartment on Brighton seafront. Thank you!

We were aware it was the seagull breeding season and were slightly cautious about what reception we may get when we climbed out of the hatch onto the roof. We it's fair to say, in our limited experience, seagulls take exception to sharing a rooftop when they have chicks around!


The galvanised wire fencing was perfect for fixing the cameras too. We used Duck Tape to very tightly fix them to the mesh fencing. It is critical that they do not move in the wind to avoid 'camera shake'.

Don't forget to remove the tape over the pinhole once they are fixed in place.


We had six cameras to install, 3 made from drinks cans and 3 from film canisters. We installed them facing in different directions:
  • film canister- facing due east across the roofscape.
  • film canister- facing due south across the roof to the sea.
  • film canister- facing due west across the roofscape.
  • drinks can - facing south west toward Brighton Pier.
  • drinks can - facing south west toward Brighton Pier.
  • drinks can -facing west across the roof scape.
We then finished off with a video.


Sunday 11 September 2011

Solargraphy - Making the cameras - 22 June 2011

Following Mike Oddhayward's thread in the Brighton Analogue Flickr group, Mike Oddhayward, Simon Tomlinson and myself met in Add The Colour to make some pinhole cameras for solargraphy. We were later joined by Nadine Burzler and Graham Lally. The materials and tools needed are very simple and readily available:

  • drinks cans and film canisters for the camera bodies
  • scissors
  • matt black paint
  • paintbrush
  • strong waterproof tape
  • needle
  • B&W photographic paper
Using a drinks can:

1. Cut the top off the can, leaving the rim intact


2. Cut an approx  1cm x 1cm hole in the front of the can.


3. Paint the inside of the can with matt black paint.

4. From a different can, cut a piece of tin approx 3cm x 3cm.

5. With a very fine needle, pierce the centre of the 3cm x 3cm piece of tin with the tiniest of holes. We found placing the piece of tin on a hard table and lightly tapping the end of the needle with a knife handle was all it took. The hole was barely visible to the naked eye and could only be seen when the piece of tin was held up to the light.

6. Tape the 3cm x 3cm piece of tin over the 1cm x 1cm hole, making sure the pinhole is in the middle of the 1cm x 1cm hole. Shiney metal surface to the outside. (For clarity the tape is not shown).


7. It is crucial that all taping is extremely thorough to ensure there is no water ingress at all. We used electrical tape around the 3cm x 3cm piece of tin, see below.


8. That's the camera made, now to insert the photographic paper and seal the camera.

9. First, make a tape 'patch' that will be placed on the top of the can once the paper has been inserted. We used silver Duck Tape, but found in use that it weathered quite badly. On our next cameras we intend to use Flashband or similiar construction waterproofing tape.


10. The next step is to insert the photographic paper into the can. We used Ilford Multigrade lV, resin coated, pearl finish, photographic paper. Prior to going into a darkroom we cut a template for the photographic paper with a sheet of normal paper. This makes it much easier to cut the photographic paper once in the darkroom. The photographic paper, shown blue on the left diagram below, should go round the inside of the can, leaving a gap about 2cm wide where the pinhole is. Vertically the paper should be the height of the flat part of the can, see the diagram on the right below.


11. Put a small piece of tape over the pinhole to prevent light entering at this stage.

12. Take the following into the darkroom with you:
  • can camera
  • tape patch
  • photographic paper
  • scissors
  • paper template
13. Once in the darkroom with the red safelight on,
  • Take the photographic paper out of its protective bag, and using the paper template, cut it to the correct size. 
  • Carefully place the photographic paper into the can camera with the active side facing into the middle of the can. Make sure the paper has not obscured the pinhole. Although we didn't do it this time, we will almost certainly tape the photographic paper in place by its corners, to make sure there is no chance of it moving and obscuring the pinhole when being carried around. This would be very important with larger pinhole cameras.
  • Put the tape patch over the cut end of the can camera and carefully dress the tape down the sides of the can, making sure the can camera is completely light tight.
14. You can now leave the darkroom.

15. We completely covered the can cameras with Duck Tape, see below, to make sure there would be no water ingress through either the cut end of the can or around the piece of tin that forms the pinhole.


The principle is exactly the same with the film canisters.

The cameras were now finished! We were very happy and excited about the next stages of this project, installing the cameras and seeing if they worked!

It took a few hours to make about 6 cameras but we were chatting alot and experimenting as we went. Now that we have a better idea of what we were doing I would say one person could make 3 cameras in about an hour with a bit of a production line going.

Simon Tomlinson and Nadine Burzler also made cameras but I'm not sure if they have installed them anywhere yet. It would be great to see your results if you have.

Saturday 10 September 2011

The Pinhole Diaries. Why?

Why have we done this blog? Well Mike and I have been talking about various film/emulsion projects for quite a while and recently got going on one. Solargraphy. Back in June 2011 Mike Oddhayward posted a thread in the Brighton Analogue Flickr group asking if anyone was interested in trying some Solargraphy and a meet up was arranged to make some pinhole cameras, see later posts for details. Once the cameras had been made and installed, Mike and I wanted to record what we did on this and other projects to provide accurate data for what we learn. A Blog seemed like a good idea as we can share our information and discuss details with other like minded people.

We hope you enjoy our journey and please feel free to contribute.

All the Best, Mike and Mike